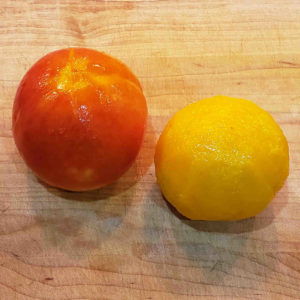
One way to peel a peach is with a standard vegetable peeler. The other way to peel a peach is with the scald and tug technique. The first thing you should know about the two techniques is that they give you different results. Note the photo above. The peach on the left was peeled with the scald and tug technique, while the one on the right was peeled with a vegetable peeler. Note how the one on the left maintains the red and orange pigments while the one on the right, they are removed. The peach has pigments in the skin and just below the skin. The scald and tug method is gentle enough to leave the pigments below the skin intact. The vegetable peeler removes a tiny bit of peach flesh along with the skin, so those pigments are lost. To me, the biggest reason to use the scald and tug technique is for presentation. Let’s talk about the two techniques, and then when you might use one or the other.
The Scald and Tug Technique

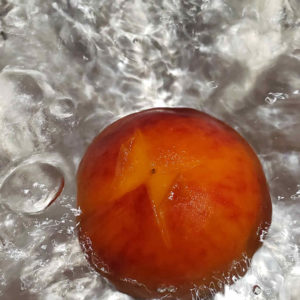
This method takes some prep. You need a small pot of boiling water and a large bowl with a generous amount of ice in cold water. For each peach, use a sharp knife to cut a shallow X at the bottom of the peach. Scald the peaches in small batches by lowering them into the boiling water with a slotted spoon or a pasta fork. The water doesn’t need to be deep enough to immerse the peaches. If they are 2/3 covered, and you roll them around a bit while they are scalding, that works well. After 30 seconds to a minute, transfer them to the ice bath. The time depends on the ripeness of the peach. You don’t want to actually cook the flesh of the peach, just scald it at the surface. A clue that I look for is to watch the skin at the X as I roll the peaches around in the boiling water. When it starts to peel away on its own, you are done. The peaches should cool almost instantly in the ice bath.

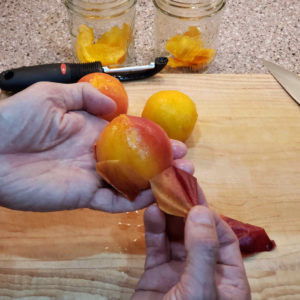
When they are comfortable to handle, grip the peach with one hand and use your thumb and forefinger on the other hand to grab the loose skin and pull it off. Some people prefer to use a paring knife and grip the skin between their thumb and the blade of the pairing knire. Either way, if you timed the scald properly, the skin should come off easier than the peel of a banana.
Using a Vegetable Peeler
This method is pretty straight forward. Using a vegetable peeler is one of the first kitchen skills most people acquire. But peaches are more delicate than potatoes or carrots. There’s a bit of a finesse that you can use to be more successful using vegetable peelers on ripe peaches. Let me use an analogy to describe the finesse. When you use a chef’s knife to cut up vegetables, you may be able to cut them with significant downward pressure. Let’s call this cleaving the vegetables. Or, you can use a bit of forward and back motion while applying relatively gentle downward pressure. Let’s call this slicing the vegetables. “Cleaving” the vegetable skin with a vegetable peeler, using a straight motion and significant pressure works great on carrots and potatoes. With a tender peach, you really want to take advantage of the slicing motion. Instead of simply pulling the peeler straight down, add a little sideways motion to allow the peeler to slice. Some people use a little zig-zag. I have a knack to use a very gentle arc motion. Whatever works for you. If you feel the peach skin being tugged, you’re cleaving. If you feel minimal resistance from the peach skin, you are slicing.
You also have the choice of a Y shaped peeler or a straight peeler. I know a lot of people who swear by the Y shaped peeler. They feel it is more ergonomic and more efficient for them. I have both types of peelers in the drawer, but I almost always reach for the straight peeler. When I’m peeling something round that fits in one hand (like an apple or a peach), I use my fingers to hold the peeler and my thumb to brace the fruit. It’s the same mechanics that I’d use with a paring knife (whether I’m peeling or slicing something with that paring knife). It just feels totally natural to me.
When to Use Each Technique
I already mentioned in the first paragraph the main reason that motivates me to the scald and tug method over the peeler. Scald and tug leaves the gorgeous colors of the peach in place. But, if I have one peach to peel, I’m probably going to use the vegetable peeler (or elect to keep the skin on the peach). It’s just too much work to get a pot of water boiling and setting up an ice bath, just for a single peach. But, when you get to 6 or more peaches, the total effort actually switches. Tugging the skin off a scalded peach is super quick in comparison to peeling a single peach with a vegetable peeler. When there’s a lot of peeling to do, the setup effort of the scald and tug technique pays off.
And, there’s one more factor to consider. If the peaches are under-ripe, the scald and tug technique just doesn’t work. You have to scald for so long that the outer layer of flesh gets cooked, and then the tugging ends up tearing up the flesh. On the other hand, if the peaches are overripe, a vegetable peeler will tear them apart. With over-ripe peaches, scald and tug is the way to go. If the peaches are anywhere near the Goldilocks zone, you should have success with either method.

